zeldor.biz

Linux, programming and more

Copyright © 2025
Log in

Cisco OSPF configuration

September 25, 2010 by Igor Drobot Leave a Comment

The command turns on the OSPF routing protocol with a process id of 1. The network line must be added to tell the router which networks will be participating in OSPF. This command can be expanded to include stub areas and not so stubby areas. That is how Cisco refers to it. You can run multiple processes of OSPF using different process ids.

1
2
router(config)# router ospf 1
router(config-router)# network 10.130.0.0 0.0.255.255 area 130

router(config)# router ospf 1 router(config-router)# network 10.130.0.0 0.0.255.255 area 130

Debug OSPF:

1
2
show ip ospf neighbor
show ip ospf interface

show ip ospf neighbor show ip ospf interface

Filed Under: Cisco, Networking Tagged With: OSPF, Routing

Frame Relay

September 25, 2010 by Igor Drobot Leave a Comment

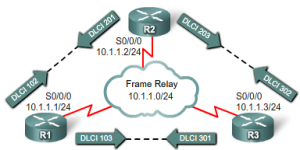
Before a Cisco router is able to transmit data over Frame Relay, it needs to know which local DLCI maps to the Layer 3 address of the remote destination. Cisco routers support all Network layer protocols over Frame Relay, such as IP, IPX, and AppleTalk. This address-to-DLCI mapping can be accomplished either by static or dynamic mapping.

The Frame Relay service provider assigns DLCI numbers. Usually, DLCIs 0 to 15 and 1008 to 1023 are reserved for special purposes. Therefore, service providers typically assign DLCIs in the range of 16 to 1007.

To map between a next hop protocol address and DLCI destination address, use this command:

1
frame-relay map protocol protocol-address dlci [broadcast] [ietf] [cisco]

frame-relay map protocol protocol-address dlci [broadcast] [ietf] [cisco]

Use the keyword ietf when connecting to a non-Cisco router.
You can greatly simplify the configuration for the Open Shortest Path First (OSPF) protocol by adding the optional broadcast keyword when doing this task.

Static FR Address Mapping:

1
2
3
4
5
6
R1 (config) # interface s0/0/0
R1 (config-if) # ip address 10.1.1.1 255.255.255.0
R1 (config-if) # encapsulation frame-relay
R1 (config-if) # no frame-relay inverse-arp
R1 (config-if) # frame-relay map ip 10.1.1.2 102 broadcast cisco
R1 (config-if) # no shut

R1 (config) # interface s0/0/0 R1 (config-if) # ip address 10.1.1.1 255.255.255.0 R1 (config-if) # encapsulation frame-relay R1 (config-if) # no frame-relay inverse-arp R1 (config-if) # frame-relay map ip 10.1.1.2 102 broadcast cisco R1 (config-if) # no shut

1
2
3
4
5
R1 (config) # interface s0/0/0
R1 (config-if) # ip address 10.1.1.1 255.255.255.252
R1 (config-if) # encapsulation frame-relay
R1 (config-if) # bandwidth 64
R1 (config-if) # frame relay map ip 10.1.1.2 102 broadcast

R1 (config) # interface s0/0/0 R1 (config-if) # ip address 10.1.1.1 255.255.255.252 R1 (config-if) # encapsulation frame-relay R1 (config-if) # bandwidth 64 R1 (config-if) # frame relay map ip 10.1.1.2 102 broadcast

1
R1 (config-if) # frame-relay lmi-type ansi

R1 (config-if) # frame-relay lmi-type ansi

Basically, the LMI is a keepalive mechanism that provides status information about Frame Relay connections between the router (DTE) and the Frame Relay switch (DCE).


US Bandwidth:

E0 64 kbit/s
E1 2.048 Mbit/s
E2 8.448 Mbit/s
E3 34.368 Mbit/s
E4 139.264 Mbit/s
E5 564.992 Mbit/s
T1 1,536 Kb/s UP and DOWN

Filed Under: Cisco, Networking Tagged With: Cisco, Frame Relay

Windows Server 2008 RDP

September 25, 2010 by Igor Drobot Leave a Comment

Windows Server 2008 is, as the name suggests, a server operating system which in the real world this means that systems running Windows Server 2008 will most likely be located in large rack systems in a server room. As such, it is highly unlikely that system administrators are going to want to have to physically visit each of these servers to perform small routine administrative tasks such as create a new system user…

To invoke the Remote Desktop Client in virtual session mode either select Start -> All Programs -> Accessories -> Remote Desktop Connection or enter the following in the Run dialog or at a command prompt:

1
mstsc

mstsc

To start the Remote Desktop Client in administrator mode try this one out:

1
mstsc /admin

mstsc /admin

Filed Under: Networking, Windows Tagged With: R2, RDP, Remote, Windows Server 2008

TCPDUMP – and the power of it

September 5, 2010 by Igor Drobot Leave a Comment

Tcpdump is one of the best network analysis-tools ever for information security professionals. Tcpdump is for everyone for hackers and people who have less of TCP/IP understanding. Many prefer to use higher-level analysis tools such Wireshark, but I believe it is a mistake. With tcpdump you can decode layers 2-7 of OSI model. The first layer represent only electrical signals and 000-zeros and 111-ones.

Options

Below are some tcpdump options (with useful examples) that will help you working with the tool. They’re very easy to forget and/or confuse with other types of filters, i.e. ethereal, so hopefully this article can serve as a reference for you, as it does me:)

The first of these is -n, which requests that names are not resolved, resulting in the IPs themselves.
The second is -X, which displays both hex and ascii content within the packet.
The final one is -S, which changes the display of sequence numbers to absolute rather than relative.

-i any : Listen on all interfaces just to see if you’re seeing any traffic.
-n : Don’t resolve hostnames.
-nn : Don’t resolve hostnames or port names.
-X : Show the packet’s contents in both hex and ASCII.
-XX : Same as -X, but also shows the ethernet header.
-v, -vv, -vvv : Increase the amount of packet information you get back.
-c : Only get x number of packets and then stop.
-S : Print absolute sequence numbers.
-e : Get the ethernet header as well.
-q : Show less protocol information.
-E : Decrypt IPSEC traffic by providing an encryption key.
-s : Set the snaplength, i.e. the amount of data that is being captured in bytes
-c : Only capture x number of packets, e.g. ‘tcpdump -c 3’


1. Basic communication // see the basics without many options

1
tcpdump -nS

tcpdump -nS

2. Basic communication (very verbose) // see a good amount of traffic, with verbosity and no name help

1
tcpdump -nnvvS

tcpdump -nnvvS

3. A deeper look at the traffic // adds -X for payload but doesn’t grab any more of the packet

1
tcpdump -nnvvXS

tcpdump -nnvvXS

4. Heavy packet viewing // the final “s” increases the snaplength, grabbing the whole packet

1
tcpdump -nnvvXSs 1514

tcpdump -nnvvXSs 1514


Expressions
* host // look for traffic based on IP address (also works with hostname if you’re not using -n)

1
tcpdump host 192.168.1.1

tcpdump host 192.168.1.1

* src, dst // find traffic from only a source or destination (eliminates one side of a host conversation)

1
2
tcpdump src 192.168.1.1
tcpdump dst 10.1.100.3

tcpdump src 192.168.1.1 tcpdump dst 10.1.100.3

* net // capture an entire network using CIDR notation

1
tcpdump net 1.2.3.0/24

tcpdump net 1.2.3.0/24

* proto // works for tcp, udp, and icmp. Note that you don’t have to type proto

1
tcpdump icmp

tcpdump icmp

* port // see only traffic to or from a certain port

1
tcpdump port 3389

tcpdump port 3389

* src, dst port // filter based on the source or destination port

1
2
tcpdump src port 1025
tcpdump dst port 389

tcpdump src port 1025 tcpdump dst port 389

* src/dst, port, protocol // combine all three

1
2
tcpdump src port 1025 and tcp
tcpdump udp and src port 53

tcpdump src port 1025 and tcp tcpdump udp and src port 53

* Port Ranges // see traffic to any port in a range

1
tcpdump portrange 21-23

tcpdump portrange 21-23

* Packet Size Filter // only see packets below or above a certain size (in bytes)

1
2
tcpdump less 32
tcpdump greater 128

tcpdump less 32 tcpdump greater 128

[ You can use the symbols for less than, greater than, and less than or equal / greater than or equal signs as well. ]
// filtering for size using symbols

1
2
tcpdump > 32
tcpdump <= 128

tcpdump > 32 tcpdump <= 128


Writing to a File
Capture all Port 80 traffic to a file:

1
tcpdump -i eth1 port 80 -w http_traffic

tcpdump -i eth1 port 80 -w http_traffic

Read Captured Traffic back into tcpdump:

1
tcpdump -r http_traffic

tcpdump -r http_traffic

You can use it for “screen” and later for graphical wireshark analyzes.


Getting Creative

Expressions are very nice, but the real magic of tcpdump comes from the ability to combine them in creative ways in order to isolate exactly what you’re looking for. There are three ways to do combination:

1. AND
and or &&
2. OR
or or ||
3. EXCEPT
not or !

Traffic that’s from 192.168.1.1 AND destined for ports 3389 or 22

1
tcpdump 'src 192.168.1.1 and (dst port 3389 or 22)'

tcpdump 'src 192.168.1.1 and (dst port 3389 or 22)'


Advanced
Show me all URG packets:

1
tcpdump 'tcp[13] & 32 != 0'

tcpdump 'tcp[13] & 32 != 0'

Show me all ACK packets:

1
tcpdump 'tcp[13] & 16 != 0'

tcpdump 'tcp[13] & 16 != 0'

Show me all PSH packets:

1
tcpdump 'tcp[13] & 8 != 0'

tcpdump 'tcp[13] & 8 != 0'

Show me all RST packets:

1
tcpdump 'tcp[13] & 4 != 0'

tcpdump 'tcp[13] & 4 != 0'

Show me all SYN packets:

1
tcpdump 'tcp[13] & 2 != 0'

tcpdump 'tcp[13] & 2 != 0'

Show me all FIN packets:

1
tcpdump 'tcp[13] & 1 != 0'

tcpdump 'tcp[13] & 1 != 0'

Show me all SYN-ACK packets:

1
tcpdump 'tcp[13] = 18'

tcpdump 'tcp[13] = 18'

Show all traffic with both SYN and RST flags set: (that should never happen)

1
tcpdump 'tcp[13] = 6'

tcpdump 'tcp[13] = 6'

Show all traffic with the “evil bit” set:

1
tcpdump 'ip[6] & 128 != 0'

tcpdump 'ip[6] & 128 != 0'

Display all IPv6 Traffic:

1
tcpdump ip6

tcpdump ip6

Filed Under: IPv6, Kernel, Linux, Networking, Tcpdump Tagged With: flow control, icmp, tcpdump

FTP over IPv6

September 4, 2010 by Igor Drobot Leave a Comment

The standard ftp command/client does not support IPv6 resolution.

A very powerful IPv6 ftp client alternative is lftp.

1
2
3
id@acer:~$ lftp ipv6.idrobot.net
lftp ipv6.idrobot.net:~> dir
-rw-r--r--   1 ftp      ftp             0 Aug 26 17:28 test.txt

id@acer:~$ lftp ipv6.idrobot.net lftp ipv6.idrobot.net:~> dir -rw-r--r-- 1 ftp ftp 0 Aug 26 17:28 test.txt

And of course Firefox does FTP over IPv6:
ftp://ipv6.idrobot.net OR ftp://[2a01:4f8:131:51e2::10]

Filed Under: FTP, IPv6, Linux, Networking Tagged With: FTP, ftp ipv6, Ipv6, lftp ipv6

  • « Previous Page
  • 1
  • …
  • 12
  • 13
  • 14
  • 15
  • 16
  • 17
  • Next Page »
Yeaaah Cookie! We use cookies to ensure that we give you the best experience on our website. If you continue to use this site we will assume that you are happy with it.Ok