zeldor.biz

Linux, programming and more

Copyright © 2023
Log in

All Debian Releases

February 3, 2011 by Igor Drobot Leave a Comment

Debian

Very nice overview about all Debian releases:

Debian 8.0 Jessie
Debian 7.0 (coming 2013) Wheezy
Debian 6.0 (Latest Stable) 6 February 2011 Squeeze
Debian 5.0 14 February 2009 Lenny (5.0.7)
Debian 4.0 8 April 2007 Etch
Debian 3.1 6 June 2005 Sarge
Debian 3.0 19 July 2002 Woody
Debian 2.2 15 August 2000 Potato
Debian 2.1 March 9th, 1999 Slink
Debian 2.0 July 24th, 1998 Hamm
Debian 1.3 June 5th, 1997 Bo
Debian 1.2 December 12th, 1996 Rex
Debian 1.1 June 17th, 1996 Buzz
Debian 1.0 Never released –
Debian 0.93R6 November 1995 –
Debian 0.93R5 March 1995 –
Debian 0.91 January 1994 –
Debian 0.01 through 0.90 August-December 1993 –

Filed Under: Debian, Linux Tagged With: Buzz, Debian, Etch, Hamm, Potato, Rex, Sarge, Slink, Woody

Icinga with Lighttpd

December 22, 2010 by Igor Drobot 3 Comments

Some days ago I wrote a similar post about nagios and lighty, now I decided to test Icinga on Debian Squeeze.

The installation was pretty easy:

1
2
aptitude install lighttpd
aptitude install icinga

aptitude install lighttpd aptitude install icinga

To use Icinga we need following modules:

  • mod_cgi
  • mod_auth
  • mod_setenv

[Read more…]

Filed Under: Debian, Linux, Monitoring, Ubuntu Tagged With: Debian, Icinga, Monitoring, Squeeze, Ubuntu

Install Grub from chroot

December 21, 2010 by Igor Drobot 16 Comments

The simple way to install grub/ grub2 from any linux live-CD or any other bootable medium.

Step 1: boot from linux live CD/DVD or even USB
Step 2: mount your hdd
Step 3: chroot in the mounted filesystem
Step 3: install grub
Step 4: reboot

1
2
3
4
5
6
7
8
9
fdisk -l
mount /dev/sda1 /mnt/
mount -t proc none /mnt/proc
mount -o bind /dev /mnt/dev
mount -t sysfs sys /mnt/sys
chroot /mnt/ /bin/bash
update-grub
/usr/sbin/grub-install --recheck --no-floppy /dev/sda
sync & reboot

fdisk -l mount /dev/sda1 /mnt/ mount -t proc none /mnt/proc mount -o bind /dev /mnt/dev mount -t sysfs sys /mnt/sys chroot /mnt/ /bin/bash update-grub /usr/sbin/grub-install --recheck --no-floppy /dev/sda sync & reboot

SUSE Syntax:
update-grub is debian and ubuntu little helper this execute the same as:

1
2
3
grub2-install --recheck --no-floppy /dev/sda
grub2-mkconfig -o /boot/grub2/grub.cfg
mkinitrd

grub2-install --recheck --no-floppy /dev/sda grub2-mkconfig -o /boot/grub2/grub.cfg mkinitrd

Filed Under: Bash, Debian, Ubuntu Tagged With: chroot, Debian, Grub, Grub2, install grub, MBR, openSUSE, Ubuntu

Setting up Soft RAID

August 27, 2010 by Igor Drobot Leave a Comment

This is a very quick guide to setting up a Linux software RAID.

All these examples are same for RAID0 and RAID1

0. Disclaimer
Make sure you back up all your data, or you have empty hdds before you proceed.

1. Disk management
I’m using 2 same HDDs with 400Gigs.

1
2
Disk /dev/sdb: 400.0 GB, 400088457216 bytes
Disk /dev/sdc: 400.0 GB, 400088457216 bytes

Disk /dev/sdb: 400.0 GB, 400088457216 bytes Disk /dev/sdc: 400.0 GB, 400088457216 bytes

I created on both disks new partitions with parted (also you can use gparted):

1
2
/dev/sdb1               1       48641   390708801   83  Linux
/dev/sdc1               1       48641   390708801   83  Linux

/dev/sdb1 1 48641 390708801 83 Linux /dev/sdc1 1 48641 390708801 83 Linux


2. Raid creation

1
2
$ aptitude update
$ aptitude install mdadm

$ aptitude update $ aptitude install mdadm

For RAID-0

1
$ mdadm --create /dev/md0 --level=0 --raid-devices=2 /dev/sdb1 /dev/sdc1

$ mdadm --create /dev/md0 --level=0 --raid-devices=2 /dev/sdb1 /dev/sdc1

For RAID-1

1
$ mdadm --create /dev/md0 --level=1 --raid-devices=2 /dev/sdb1 /dev/sdc1

$ mdadm --create /dev/md0 --level=1 --raid-devices=2 /dev/sdb1 /dev/sdc1

3. Get RAID information

1
2
$ fdisk -l
Disk /dev/md0: 800.1 GB, 800171491328 bytes

$ fdisk -l Disk /dev/md0: 800.1 GB, 800171491328 bytes

1
2
3
4
5
6
7
$ cat /proc/mdstat
Personalities : [linear] [multipath] [raid0] [raid1] [raid6] [raid5] [raid4] [raid10] 
md0 : active raid0 sdc1[1] sdb1[0]
      781417472 blocks 64k chunks
 
unused devices: <none>
</none>

$ cat /proc/mdstat Personalities : [linear] [multipath] [raid0] [raid1] [raid6] [raid5] [raid4] [raid10] md0 : active raid0 sdc1[1] sdb1[0] 781417472 blocks 64k chunks unused devices: <none> </none>

1
2
$ mdadm --detail --scan
ARRAY /dev/md0 level=raid0 num-devices=2 metadata=00.90 UUID=fb3d1fd3:5dd2b871:01f9e43d:ac30fbff

$ mdadm --detail --scan ARRAY /dev/md0 level=raid0 num-devices=2 metadata=00.90 UUID=fb3d1fd3:5dd2b871:01f9e43d:ac30fbff

1
2
3
4
5
6
7
8
9
10
11
12
13
14
15
16
17
18
19
20
21
22
23
24
25
26
$ mdadm --detail /dev/md0 
/dev/md0:
        Version : 00.90
  Creation Time : Fri Aug 27 21:27:51 2010
     Raid Level : raid0
     Array Size : 781417472 (745.22 GiB 800.17 GB)
   Raid Devices : 2
  Total Devices : 2
Preferred Minor : 0
    Persistence : Superblock is persistent
 
    Update Time : Fri Aug 27 22:46:13 2010
          State : active
 Active Devices : 2
Working Devices : 2
 Failed Devices : 0
  Spare Devices : 0
 
     Chunk Size : 64K
 
           UUID : fb3d1fd3:5dd2b871:2ce552e4:6d63ea58
         Events : 0.3
 
    Number   Major   Minor   RaidDevice State
       0       8       17        0      active sync   /dev/sdb1
       1       8       33        1      active sync   /dev/sdc1

$ mdadm --detail /dev/md0 /dev/md0: Version : 00.90 Creation Time : Fri Aug 27 21:27:51 2010 Raid Level : raid0 Array Size : 781417472 (745.22 GiB 800.17 GB) Raid Devices : 2 Total Devices : 2 Preferred Minor : 0 Persistence : Superblock is persistent Update Time : Fri Aug 27 22:46:13 2010 State : active Active Devices : 2 Working Devices : 2 Failed Devices : 0 Spare Devices : 0 Chunk Size : 64K UUID : fb3d1fd3:5dd2b871:2ce552e4:6d63ea58 Events : 0.3 Number Major Minor RaidDevice State 0 8 17 0 active sync /dev/sdb1 1 8 33 1 active sync /dev/sdc1

4. Create file system
That all you have a running RAID array, to use it you need to create a filesystem for example ext3 one.

1
mkfs.ext3 /dev/md0

mkfs.ext3 /dev/md0

Delete RAID array:

1
mdadm --stop /dev/md0

mdadm --stop /dev/md0

To make sure it doesn’t come back, you need to delete the RAID super blocks…

1
2
mdadm --misc --zero-superblock /dev/sdb1
mdadm --misc --zero-superblock /dev/sdc1

mdadm --misc --zero-superblock /dev/sdb1 mdadm --misc --zero-superblock /dev/sdc1

You can mount your raid partition automatically on server start:

1
vim /etc/fstab

vim /etc/fstab

And add this line to it:

1
/dev/md0        /mnt           ext3    defaults    0   0

/dev/md0 /mnt ext3 defaults 0 0

md0 will automatically mounted to /mnt/

Start a partially built array:

1
2
3
4
5
6
7
$ mdadm --run /dev/md0
 
 
Personalities : [linear] [multipath] [raid0] [raid1] [raid6] [raid5] [raid4] [raid10] 
md0 : active raid1 sdb1[0] sdc1[1]
      390708736 blocks [2/2] [UU]
      [&gt;....................]  resync =  0.0% (277568/390708736) finish=70.3min speed=92522K/sec

$ mdadm --run /dev/md0 Personalities : [linear] [multipath] [raid0] [raid1] [raid6] [raid5] [raid4] [raid10] md0 : active raid1 sdb1[0] sdc1[1] 390708736 blocks [2/2] [UU] [&gt;....................] resync = 0.0% (277568/390708736) finish=70.3min speed=92522K/sec

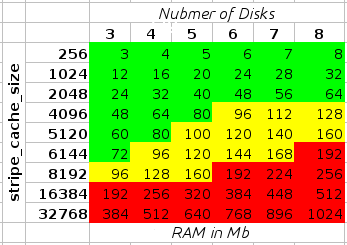
Don’t forget the RAM usage:

Filed Under: Debian, Linux Tagged With: array, Debian, mdadm, RAID, raid0, raid1, soft raid

KVM don’t shut down properly

August 1, 2010 by Igor Drobot Leave a Comment

I was playing again a little bit with KVM virtualization and found one very strange thing, my KVM kills guests instead of properly shutdown.

KVM just sends an ACPI signal to the guest to tell it to shut down. Of course, this means the guest needs to do something useful when it receives the signal. By default Debian/Ubuntu guests don’t understand ACPI signals.

The solution is: install acpid in each guest.

1
aptitude update ; aptitude install acpid

aptitude update ; aptitude install acpid

After installing this, the ’shutdown’ and ‘reboot’ buttons worked perfectly!

Filed Under: Debian, Linux, Virtualization Tagged With: acpid, Debian, KVM, qemu, virtualization

  • « Previous Page
  • 1
  • …
  • 5
  • 6
  • 7
  • 8
  • Next Page »