zeldor.biz

Linux, programming and more

Copyright © 2023
Log in

Persistent IPv6 Address

July 21, 2010 by Igor Drobot 1 Comment

I show you, how to add a secondary IPv6 Address to your existing one.
You need only to edit “vim /etc/network/interfaces” file and add the IPv6 networking configuration.

1
2
3
4
5
6
7
8
9
10
11
12
13
# The loopback network interface
auto lo
iface lo inet loopback
 
# The primary network interface
auto eth0
iface eth0 inet static
 address 10.1.100.4
 gateway 10.1.100.1
 netmask 255.255.255.0
 pre-up modprobe ipv6
 post-up ip addr add 2001:470:1f0b:1514::4/64 dev eth0 
 post-up ip route add default via 2001:470:1f0b:1514::1 dev eth0

# The loopback network interface auto lo iface lo inet loopback # The primary network interface auto eth0 iface eth0 inet static address 10.1.100.4 gateway 10.1.100.1 netmask 255.255.255.0 pre-up modprobe ipv6 post-up ip addr add 2001:470:1f0b:1514::4/64 dev eth0 post-up ip route add default via 2001:470:1f0b:1514::1 dev eth0

Another way to do the same:

1
2
3
4
5
6
pre-up modprobe ipv6
 
iface eth0 inet6 static
 address 2001:470:1f0b:1514::4
 netmask 64
 gateway 2001:470:1f0b:1514::1

pre-up modprobe ipv6 iface eth0 inet6 static address 2001:470:1f0b:1514::4 netmask 64 gateway 2001:470:1f0b:1514::1

Also you can put the ipv6 module in to “/etc/modules” instead of “pre-up modprobe ipv6”

Test it:

1
ping6 ipv6.google.com

ping6 ipv6.google.com

Some complexe example:

1
2
3
4
5
6
7
8
9
10
11
12
13
14
15
16
17
18
19
20
21
22
23
24
25
26
27
28
# The loopback network interface
auto lo
iface lo inet loopback
 
# The primary network interface
allow-hotplug eth0
iface eth0 inet static
        address 188.40.116.234
        netmask 255.255.255.0
        network 188.40.116.0
        broadcast 188.40.116.255
        gateway 188.40.116.206
 
auto eth0:1
iface eth0:1 inet static
        address 192.168.2.70
        netmask 255.255.255.0
 
# IPv6 over tunnel-broker
auto he-ipv6
iface he-ipv6 inet6 v4tunnel
 endpoint   216.66.80.30
 ttl        255
 address    2001:470:1f0a:1604::2
 netmask    64
 mtu        1480
 post-up ip addr add 2001:470:1f0b:1604::1/64 dev eth0
 post-up ip route add ::/0 dev he-ipv6

# The loopback network interface auto lo iface lo inet loopback # The primary network interface allow-hotplug eth0 iface eth0 inet static address 188.40.116.234 netmask 255.255.255.0 network 188.40.116.0 broadcast 188.40.116.255 gateway 188.40.116.206 auto eth0:1 iface eth0:1 inet static address 192.168.2.70 netmask 255.255.255.0 # IPv6 over tunnel-broker auto he-ipv6 iface he-ipv6 inet6 v4tunnel endpoint 216.66.80.30 ttl 255 address 2001:470:1f0a:1604::2 netmask 64 mtu 1480 post-up ip addr add 2001:470:1f0b:1604::1/64 dev eth0 post-up ip route add ::/0 dev he-ipv6

Filed Under: Debian, IPv6, Linux, Networking Tagged With: Debian, interfaces, Ipv6, Linux, network, Ubuntu

Get IPv6 Ready

July 4, 2010 by Igor Drobot Leave a Comment

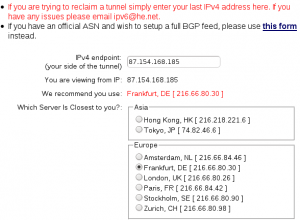
First step is to register a free IPv6 address. Tunnelbroker (tunnelbroker.net) from Hurricane Electrics is one of the best ipv6 offerers. With just a few clicks, you can create a free account.

After you get your generated password to your mail-account, you can login.

After login select on the left side «User Functions > Create Regular Tunnel»;

Important: Your ISP and your Router/Gateway should allow ICMP packets.

Configuration:

1
2
3
4
5
6
7
8
9
10
11
12
# Hurricane Electrics IPv4 Server: 216.66.80.30
# My local IP Address: 87.154.168.185
 
# Hurricane Electrics IPv6 Server: 2001:470:1f0a:1514::1/64
# My IPv6 Adress 2001:470:1f0a:1514::2/64
 
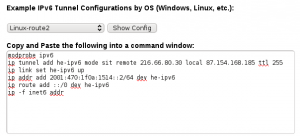
/sbin/ip tunnel add he-ipv6 mode sit remote 216.66.80.30 local 87.154.168.185  ttl 255
/sbin/ip link set he-ipv6 up
/sbin/ip addr add 2001:470:1f0a:1514::2/64 dev he-ipv6
/sbin/ip route add ::/0 dev he-ipv6
/sbin/ip route add 2001:470:9d36::/48 dev lo
exit 0

# Hurricane Electrics IPv4 Server: 216.66.80.30 # My local IP Address: 87.154.168.185 # Hurricane Electrics IPv6 Server: 2001:470:1f0a:1514::1/64 # My IPv6 Adress 2001:470:1f0a:1514::2/64 /sbin/ip tunnel add he-ipv6 mode sit remote 216.66.80.30 local 87.154.168.185 ttl 255 /sbin/ip link set he-ipv6 up /sbin/ip addr add 2001:470:1f0a:1514::2/64 dev he-ipv6 /sbin/ip route add ::/0 dev he-ipv6 /sbin/ip route add 2001:470:9d36::/48 dev lo exit 0

Some additions (17.07.2010 – 21:46):
Also you can use this standard Debian configuration method “/etc/network/interfaces”:

1
2
3
4
5
6
7
8
# IPv6 over tunnel-broker
auto he-ipv6
iface he-ipv6 inet6 v4tunnel
 endpoint   216.66.80.30
 ttl        255
 address    2001:470:1f0a:1514::2
 netmask    64
 mtu        1480

# IPv6 over tunnel-broker auto he-ipv6 iface he-ipv6 inet6 v4tunnel endpoint 216.66.80.30 ttl 255 address 2001:470:1f0a:1514::2 netmask 64 mtu 1480

Of course you will need this extra route to make it working:

1
/sbin/ip route add ::/0 dev he-ipv6

/sbin/ip route add ::/0 dev he-ipv6

Check your configuration:

firewall ~ # ping6 ipv6.google.com
PING ipv6.google.com(2a00:1450:8004::63) 56 data bytes
64 bytes from 2a00:1450:8004::63: icmp_seq=1 ttl=56 time=42.6 ms
64 bytes from 2a00:1450:8004::63: icmp_seq=2 ttl=56 time=42.9 ms

firewall ~ # ping6 ipv6.google.com PING ipv6.google.com(2a00:1450:8004::63) 56 data bytes 64 bytes from 2a00:1450:8004::63: icmp_seq=1 ttl=56 time=42.6 ms 64 bytes from 2a00:1450:8004::63: icmp_seq=2 ttl=56 time=42.9 ms


IPv6 routing table:

1
ip -6 r

ip -6 r

Check your security:

1
nmap 2001:470:1f0a:1514::2

nmap 2001:470:1f0a:1514::2

Some screen shots:


IPv6 logo taken from: Hetzner.de


Filed Under: Debian, IPv6, Linux, Networking, Nmap Tagged With: Debian, IP version 6, Ipv6

Secure Apache2

June 17, 2010 by Igor Drobot 2 Comments

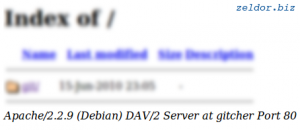
By default apache shows on each directory listing, error or non existing page etc. apache version, OS Version and some apache modules in the bottom of your site.

Attackers can use this information to their advantage when performing an attack.
I describe a little bit how to secure apache2, to prevent the showing of apache version and server strings.

1
vim /etc/apache2/conf.d/security

vim /etc/apache2/conf.d/security

Configuration should be:

2
3
4
ServerTokens Prod
ServerSignature Off
TraceEnable Off

ServerTokens Prod ServerSignature Off TraceEnable Off

Restart apache:

1
/etc/init.d/apache2 restart

/etc/init.d/apache2 restart

Filed Under: HTTP, Linux, Networking Tagged With: apache2, Debian, HTTP, security, TRACE, webserver

GIT Version Control System

June 16, 2010 by Igor Drobot Leave a Comment

GIT is one of the best systems for version control. I don’t want talk about benefits or other things now. I tell you how to work with GIT and do really useful things with it. Very simple installation and a list of frequently used commands:


Install GIT: (You see It’s very easy)

1
apt-get update && apt-get install git-core

apt-get update && apt-get install git-core

Create new git repository:

2
git init

git init

Add all changes to repository:

3
git add .

git add .

Consolidation of all changes:

4
git commit -a

git commit -a

Consolidation of all changes with commit message:

5
git commit -a -m "Commit Message"

git commit -a -m "Commit Message"

Revert last commit:

6
git reset --soft HEAD^

git reset --soft HEAD^

Current working directory status:

7
git status

git status

Diff since last commit:

8
git diff

git diff

Add link to remote repository:

9
git remote add origin ssh://id@gitcher/opt/repository

git remote add origin ssh://id@gitcher/opt/repository

Remove link to remote repository:

10
git remote rm origin

git remote rm origin

Get all new versions from source(remote repository):

11
git pull origin master

git pull origin master

Push all new changes to source(remote repository):

12
git push origin master

git push origin master

Create new working tree(branch):

13
git branch branch_name

git branch branch_name

Change between branches:

14
git checkout branch_name

git checkout branch_name

Merge braches:

15
git merge branch_name

git merge branch_name

Delete branch:

16
git branch -d branch_name

git branch -d branch_name

Remove branch force:

17
git branch -D branch_name

git branch -D branch_name


And more complicated examples
Create local working space and push all changes to remote repository:

1
2
3
4
5
6
git init
touch Initial_File
git add Initial_File
git commit -a -m "Initial commit"
git remote add origin ssh://id@gitcher/opt/repository
git push origin master

git init touch Initial_File git add Initial_File git commit -a -m "Initial commit" git remote add origin ssh://id@gitcher/opt/repository git push origin master


Create brach, edit and merge:

1
2
3
4
5
6
7
8
9
10
git init
git branch test
git checkout test
# ...
# add changes
# ...
git commit -a -m "Branch commit"
git checkout
git merge test
git branch -d test

git init git branch test git checkout test # ... # add changes # ... git commit -a -m "Branch commit" git checkout git merge test git branch -d test

Messed up the last commit message? This will let you re-enter it:

1
git commit --amend

git commit --amend

GIT Tagging
for example you want to release a new version of your project:

1
git tag -a v0.1 -m 'Intitial tag vesrion 0.1'

git tag -a v0.1 -m 'Intitial tag vesrion 0.1'

Clone remote repositoty

1
git clone id@gitche:scripts.git

git clone id@gitche:scripts.git

Filed Under: Linux Tagged With: Control, create branch, create repository, Debian, GIT, git commit, Linux

Xen 3.2 physical bridging

June 6, 2010 by Igor Drobot Leave a Comment

This article was written for Xen 3.2, it was successful tested on debian lenny 5.0.3

I describe how to use multiple physical network cards associated to different bridges and Virtual VE (guests). By default Xen uses ony one bridge and physical NIC -> eth0

First step is to create a script that will create the bridges for your physical NICs.

/etc/xen/scripts/your-script

– eth0 is used for the Xen Dom0
– eth1 is used for VE1
– eth2 is used for VE2

1
2
3
4
5
#!/bin/sh
NETBR="/etc/xen/scripts/network-bridge"
$NETBR start bridge="eth1_br" vifnum=1 netdev="eth1"
$NETBR start bridge="eth2_br" vifnum=2 netdev="eth2"
exit 0

#!/bin/sh NETBR="/etc/xen/scripts/network-bridge" $NETBR start bridge="eth1_br" vifnum=1 netdev="eth1" $NETBR start bridge="eth2_br" vifnum=2 netdev="eth2" exit 0

Don’t forget to make it executable! chmod +x your-script

This script will be called from
/etc/xen/xend-config.sxp

put this line to it:

1
(network-script your-script)

(network-script your-script)

and remove or comment this out:

1
2
(vif-script vif-bridge)
(network-script network-dummy)

(vif-script vif-bridge) (network-script network-dummy)

then you can configure the bridge for your VE (virtual-guest)
open your config /etc/xen/node1.cfg

and remove the standard bridge: vif = [ ‘ip=192.168.1.101,mac=00:16:3E:71:0B:18’ ]
add your new bridge: vif=[‘bridge=eth1_br’]

No routing configuration is needed! fellow

With following commands you can check your bridging configuration:
brctl show

Check the routing information
netstat -arn

Q: WHY is it interesting to use this kind of configuration?
A: The traffic cannot be sniffed by Dom0, DomN or Dom2

Some reasons:
1. If you get some problems with your primary NIC eth0 your xen dom0 will not be available but your guests are still alive and can communicate

2.If somebody hack your Xen Dom0 nobody can sniff ALL traffic of the VE’s, Guests

It is possible that this configuration will not work with older xen versions, your-script must be edited wassat

Have you any questions, please do not hesitate to contact me fellow

Filed Under: Debian, Linux, Networking, Virtualization Tagged With: Debian, Xen

  • « Previous Page
  • 1
  • …
  • 6
  • 7
  • 8