zeldor.biz

Linux, programming and more

Copyright © 2025
Log in

Grub2

September 5, 2010 by Igor Drobot Leave a Comment

To see the grub menu on boot, edit the default grub config and decomment the following line:

1
2
vim /etc/default/grub
#GRUB_HIDDEN_TIMEOUT=0

vim /etc/default/grub #GRUB_HIDDEN_TIMEOUT=0

This is the default setting with only one identified operating system.

By the way, to force Grub 2 to show the menu on boot just hold down the Shift key while Grub is starting.

Filed Under: Debian, Linux, Ubuntu Tagged With: Grub, Grub2

Postfix with IPv6

September 3, 2010 by Igor Drobot Leave a Comment


In this how to I describe the basically configuration and administration of Postfix on Debian Lenny.
Current I’m using Postfix version 2.5.5
This tutorial should working with older and newer versions.

1
2
postconf -d | grep "mail_version =" | cut -d" " -f 3
2.5.5

postconf -d | grep "mail_version =" | cut -d" " -f 3 2.5.5

You can find the postfix main configuration file under “/etc/postfix”
Let see what wee need to configure a working Internet Mail-Server

1
postfix ~ # vim /etc/postfix/main.cf

postfix ~ # vim /etc/postfix/main.cf

My example configuration:

1
2
3
4
5
6
7
8
9
10
11
12
13
myhostname = ipv6.postfix.idrobot.net
alias_maps = hash:/etc/aliases
alias_database = hash:/etc/aliases
mydestination = ipv6.postfix.idrobot.net, localhost.localdomain, localhost
mynetworks = 127.0.0.0/8 [::ffff:127.0.0.0]/104 [::1]/128
smtp_bind_address6 = 2a01:4f8:101:265::37
mailbox_command =
mailbox_size_limit = 0
recipient_delimiter = +
inet_interfaces = all
inet_protocols = all
home_mailbox = Maildir/
bounce_template_file = /etc/postfix/bounce.cf

myhostname = ipv6.postfix.idrobot.net alias_maps = hash:/etc/aliases alias_database = hash:/etc/aliases mydestination = ipv6.postfix.idrobot.net, localhost.localdomain, localhost mynetworks = 127.0.0.0/8 [::ffff:127.0.0.0]/104 [::1]/128 smtp_bind_address6 = 2a01:4f8:101:265::37 mailbox_command = mailbox_size_limit = 0 recipient_delimiter = + inet_interfaces = all inet_protocols = all home_mailbox = Maildir/ bounce_template_file = /etc/postfix/bounce.cf

If you want to relay your mails to another mail-server you can use the relayhost option:
Edit main.cf, and add this line:

1
relayhost = ipv6.mx.idrobot.net

relayhost = ipv6.mx.idrobot.net

Some administration commands:
Show running config:

1
postconf -n

postconf -n

Show the default postfix config instead of running one:

1
postconf -d

postconf -d

Show message content:

1
postcat -q 7FB942082

postcat -q 7FB942082

Delete all mail in queue:

1
postsuper -d ALL

postsuper -d ALL

Schedule immediate delivery:

1
postqueue -i 7FB942082

postqueue -i 7FB942082

Flush the queue:

1
postqueue -f

postqueue -f

Filed Under: Debian, IPv6, Linux, Mailing, Networking Tagged With: Ipv6, MTA, Postfix, Postfix ipv6

Setting up Soft RAID

August 27, 2010 by Igor Drobot Leave a Comment

This is a very quick guide to setting up a Linux software RAID.

All these examples are same for RAID0 and RAID1

0. Disclaimer
Make sure you back up all your data, or you have empty hdds before you proceed.

1. Disk management
I’m using 2 same HDDs with 400Gigs.

1
2
Disk /dev/sdb: 400.0 GB, 400088457216 bytes
Disk /dev/sdc: 400.0 GB, 400088457216 bytes

Disk /dev/sdb: 400.0 GB, 400088457216 bytes Disk /dev/sdc: 400.0 GB, 400088457216 bytes

I created on both disks new partitions with parted (also you can use gparted):

1
2
/dev/sdb1               1       48641   390708801   83  Linux
/dev/sdc1               1       48641   390708801   83  Linux

/dev/sdb1 1 48641 390708801 83 Linux /dev/sdc1 1 48641 390708801 83 Linux


2. Raid creation

1
2
$ aptitude update
$ aptitude install mdadm

$ aptitude update $ aptitude install mdadm

For RAID-0

1
$ mdadm --create /dev/md0 --level=0 --raid-devices=2 /dev/sdb1 /dev/sdc1

$ mdadm --create /dev/md0 --level=0 --raid-devices=2 /dev/sdb1 /dev/sdc1

For RAID-1

1
$ mdadm --create /dev/md0 --level=1 --raid-devices=2 /dev/sdb1 /dev/sdc1

$ mdadm --create /dev/md0 --level=1 --raid-devices=2 /dev/sdb1 /dev/sdc1

3. Get RAID information

1
2
$ fdisk -l
Disk /dev/md0: 800.1 GB, 800171491328 bytes

$ fdisk -l Disk /dev/md0: 800.1 GB, 800171491328 bytes

1
2
3
4
5
6
7
$ cat /proc/mdstat
Personalities : [linear] [multipath] [raid0] [raid1] [raid6] [raid5] [raid4] [raid10] 
md0 : active raid0 sdc1[1] sdb1[0]
      781417472 blocks 64k chunks
 
unused devices: <none>
</none>

$ cat /proc/mdstat Personalities : [linear] [multipath] [raid0] [raid1] [raid6] [raid5] [raid4] [raid10] md0 : active raid0 sdc1[1] sdb1[0] 781417472 blocks 64k chunks unused devices: <none> </none>

1
2
$ mdadm --detail --scan
ARRAY /dev/md0 level=raid0 num-devices=2 metadata=00.90 UUID=fb3d1fd3:5dd2b871:01f9e43d:ac30fbff

$ mdadm --detail --scan ARRAY /dev/md0 level=raid0 num-devices=2 metadata=00.90 UUID=fb3d1fd3:5dd2b871:01f9e43d:ac30fbff

1
2
3
4
5
6
7
8
9
10
11
12
13
14
15
16
17
18
19
20
21
22
23
24
25
26
$ mdadm --detail /dev/md0 
/dev/md0:
        Version : 00.90
  Creation Time : Fri Aug 27 21:27:51 2010
     Raid Level : raid0
     Array Size : 781417472 (745.22 GiB 800.17 GB)
   Raid Devices : 2
  Total Devices : 2
Preferred Minor : 0
    Persistence : Superblock is persistent
 
    Update Time : Fri Aug 27 22:46:13 2010
          State : active
 Active Devices : 2
Working Devices : 2
 Failed Devices : 0
  Spare Devices : 0
 
     Chunk Size : 64K
 
           UUID : fb3d1fd3:5dd2b871:2ce552e4:6d63ea58
         Events : 0.3
 
    Number   Major   Minor   RaidDevice State
       0       8       17        0      active sync   /dev/sdb1
       1       8       33        1      active sync   /dev/sdc1

$ mdadm --detail /dev/md0 /dev/md0: Version : 00.90 Creation Time : Fri Aug 27 21:27:51 2010 Raid Level : raid0 Array Size : 781417472 (745.22 GiB 800.17 GB) Raid Devices : 2 Total Devices : 2 Preferred Minor : 0 Persistence : Superblock is persistent Update Time : Fri Aug 27 22:46:13 2010 State : active Active Devices : 2 Working Devices : 2 Failed Devices : 0 Spare Devices : 0 Chunk Size : 64K UUID : fb3d1fd3:5dd2b871:2ce552e4:6d63ea58 Events : 0.3 Number Major Minor RaidDevice State 0 8 17 0 active sync /dev/sdb1 1 8 33 1 active sync /dev/sdc1

4. Create file system
That all you have a running RAID array, to use it you need to create a filesystem for example ext3 one.

1
mkfs.ext3 /dev/md0

mkfs.ext3 /dev/md0

Delete RAID array:

1
mdadm --stop /dev/md0

mdadm --stop /dev/md0

To make sure it doesn’t come back, you need to delete the RAID super blocks…

1
2
mdadm --misc --zero-superblock /dev/sdb1
mdadm --misc --zero-superblock /dev/sdc1

mdadm --misc --zero-superblock /dev/sdb1 mdadm --misc --zero-superblock /dev/sdc1

You can mount your raid partition automatically on server start:

1
vim /etc/fstab

vim /etc/fstab

And add this line to it:

1
/dev/md0        /mnt           ext3    defaults    0   0

/dev/md0 /mnt ext3 defaults 0 0

md0 will automatically mounted to /mnt/

Start a partially built array:

1
2
3
4
5
6
7
$ mdadm --run /dev/md0
 
 
Personalities : [linear] [multipath] [raid0] [raid1] [raid6] [raid5] [raid4] [raid10] 
md0 : active raid1 sdb1[0] sdc1[1]
      390708736 blocks [2/2] [UU]
      [&gt;....................]  resync =  0.0% (277568/390708736) finish=70.3min speed=92522K/sec

$ mdadm --run /dev/md0 Personalities : [linear] [multipath] [raid0] [raid1] [raid6] [raid5] [raid4] [raid10] md0 : active raid1 sdb1[0] sdc1[1] 390708736 blocks [2/2] [UU] [&gt;....................] resync = 0.0% (277568/390708736) finish=70.3min speed=92522K/sec

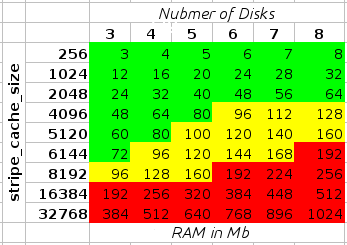
Don’t forget the RAM usage:

Filed Under: Debian, Linux Tagged With: array, Debian, mdadm, RAID, raid0, raid1, soft raid

Hurricane-Electric IPv6 certification

August 16, 2010 by Igor Drobot 1 Comment

I think you have heard already of IPv4 address depletion. A new version of Internet addressing (New Internet protocol) system was prepared many years ago. But since everyone was using IPv4 address, the migration has not been implemented in a large scale. If we continue to use IPv4 address as on today, the entire range would be used up in less than one years. (Hurricane-Electric has a very nice counter.) Public IPv4 addresses are mainly used by Internet servers. Other PCs or Servers can use private IPv4 address which are not reachable from Internet. Although many methods like NAT (Network Address Translation) and CIDR (Classless Inter Domain Routing) were implemented to stretch the IPv4 address usage, it seems that it is reaching a level of saturation now.

It is sure that everyone must migrate to IPv6 address within a couple of months/ years. Some Internet registries are not so liberal in assigning free IPv4 address now. If you want to learn about IPv6 and make sure that you have skills to administer IPv6 address and servers, Hurricane Electric free IPv6 certification is a really great way to begin. You can register for this certification at: he.net. I will give you a brief overview of the tests in the following section.

Through this test set you will be able to:

-> Prove that you have IPv6 connectivity
-> Prove that you have a working IPv6 web server
-> Prove that you have a working IPv6 email address
-> Prove that you have working forward IPv6 DNS
-> Prove that you have working reverse IPv6 DNS for your mail server
-> Prove that you have name servers can respond to queries via IPv6
-> Prove your knowledge of IPv6 technologies through quick and easy testing

There are seven levels of certification available. The breakdown of each are given below:

Newb: Read the primer stuff, be able to answer some quick and easy questions.

Explorer: Verify that you can access ipv6.he.net over IPv6

Enthusiast: Verify that you have an IPv6 capable web server that we can connect to and fetch information from. This should be entered as a FQDN and not an IPv6 address, or you will have issues once you start working on the Guru level.

Administrator: Verify that you have a working IPv6 capable MTA by sending you an email only over IPv6.

Professional: Verify that your MTA has working reverse DNS (ex: dig mx $domain +short ; dig AAAA $mx +short ; dig -x $mx AAAA +short)

Guru: Verify that the authoritative NS for your domain have AAAA records, and respond to queries for the domain (ex: step 1 is dig ns $domain ; dig AAAA $ns | step 2 is dig AAAAA $domain @$nsAAAA)

Sage: Check to see if your domain’s authoritative NS have IPv6 glue with their listed TLD servers. Meaning the TLD server can directly answer for the host record (ex: dig +trace ns $domain to get the TLD server list then dig aaaa $ns @TLD +short for the glue).

After each test you will get a new certificate:

Filed Under: Debian, IPv6, Linux, Networking, Ubuntu Tagged With: Ipv6, IPv6 default route, IPv6 routing

Hide PHP version

August 15, 2010 by Igor Drobot Leave a Comment

In order to do this, you need to do some sysdmin job:). I am going to specifically focus on Apache and PHP because I’m more of a LAMP user. If you use ASP on Microsofts IIS, I can’t help you (but hey!, Google is there to save your sunny day! :P)

Find your php.ini file in my case,

1
vim /etc/php5/apache2/php.ini

vim /etc/php5/apache2/php.ini

Look for the line that says: “expose_php On“
Change it to:

1
expose_php Off

expose_php Off

Now our PHP is very silent

Note by PHP developer:
; Decides whether PHP may expose the fact that it is installed on the server
; (e.g. by adding its signature to the Web server header). It is no security
; threat in any way, but it makes it possible to determine whether you use PHP
; on your server or not.

Filed Under: Debian, Linux Tagged With: PHP, security

  • « Previous Page
  • 1
  • …
  • 13
  • 14
  • 15
  • 16
  • 17
  • Next Page »
Yeaaah Cookie! We use cookies to ensure that we give you the best experience on our website. If you continue to use this site we will assume that you are happy with it.Ok