zeldor.biz

Linux, programming and more

Copyright © 2025
Log in

Nmap IPv6 addresses

July 24, 2010 by Igor Drobot Leave a Comment

When conducting a penetration test against an IPv6 enabled system, the first step is to determine what services are accessible over IPv6. Then you should close unnecessary ports for third persons ; for example SSH.

Consider the Nmap results below

Easy portscan syntax:

1
root@acer:~# nmap -6 2001:470:1f0b:1604::3

root@acer:~# nmap -6 2001:470:1f0b:1604::3

A little bit complexer syntax without DNS resolution, and a predefined port range:

1
root@acer:~# nmap -6 -p1-10000 -n 2001:470:1f0b:1604::3 -PN

root@acer:~# nmap -6 -p1-10000 -n 2001:470:1f0b:1604::3 -PN

Output:

1
2
3
4
5
6
7
8
9
10
11
12
13
14
15
Starting Nmap 5.00 ( https://nmap.org ) at 2010-07-24 19:16 CEST
Interesting ports on 2001:470:1f0b:1604::3:
Not shown: 9989 closed ports
PORT    STATE    SERVICE
21/tcp  open     ftp
22/tcp  open     ssh
53/tcp  open     domain
80/tcp  open     http
110/tcp open     pop3
143/tcp open     imap
443/tcp open     https
623/tcp filtered unknown
664/tcp filtered secure-aux-bus
993/tcp open     imaps
995/tcp open     pop3s

Starting Nmap 5.00 ( https://nmap.org ) at 2010-07-24 19:16 CEST Interesting ports on 2001:470:1f0b:1604::3: Not shown: 9989 closed ports PORT STATE SERVICE 21/tcp open ftp 22/tcp open ssh 53/tcp open domain 80/tcp open http 110/tcp open pop3 143/tcp open imap 443/tcp open https 623/tcp filtered unknown 664/tcp filtered secure-aux-bus 993/tcp open imaps 995/tcp open pop3s

Filed Under: IPv6, Linux, Networking, Nmap Tagged With: IPv6 security, Nmap IPv6

Persistent IPv6 Address

July 21, 2010 by Igor Drobot 1 Comment

I show you, how to add a secondary IPv6 Address to your existing one.
You need only to edit “vim /etc/network/interfaces” file and add the IPv6 networking configuration.

1
2
3
4
5
6
7
8
9
10
11
12
13
# The loopback network interface
auto lo
iface lo inet loopback
 
# The primary network interface
auto eth0
iface eth0 inet static
 address 10.1.100.4
 gateway 10.1.100.1
 netmask 255.255.255.0
 pre-up modprobe ipv6
 post-up ip addr add 2001:470:1f0b:1514::4/64 dev eth0 
 post-up ip route add default via 2001:470:1f0b:1514::1 dev eth0

# The loopback network interface auto lo iface lo inet loopback # The primary network interface auto eth0 iface eth0 inet static address 10.1.100.4 gateway 10.1.100.1 netmask 255.255.255.0 pre-up modprobe ipv6 post-up ip addr add 2001:470:1f0b:1514::4/64 dev eth0 post-up ip route add default via 2001:470:1f0b:1514::1 dev eth0

Another way to do the same:

1
2
3
4
5
6
pre-up modprobe ipv6
 
iface eth0 inet6 static
 address 2001:470:1f0b:1514::4
 netmask 64
 gateway 2001:470:1f0b:1514::1

pre-up modprobe ipv6 iface eth0 inet6 static address 2001:470:1f0b:1514::4 netmask 64 gateway 2001:470:1f0b:1514::1

Also you can put the ipv6 module in to “/etc/modules” instead of “pre-up modprobe ipv6”

Test it:

1
ping6 ipv6.google.com

ping6 ipv6.google.com

Some complexe example:

1
2
3
4
5
6
7
8
9
10
11
12
13
14
15
16
17
18
19
20
21
22
23
24
25
26
27
28
# The loopback network interface
auto lo
iface lo inet loopback
 
# The primary network interface
allow-hotplug eth0
iface eth0 inet static
        address 188.40.116.234
        netmask 255.255.255.0
        network 188.40.116.0
        broadcast 188.40.116.255
        gateway 188.40.116.206
 
auto eth0:1
iface eth0:1 inet static
        address 192.168.2.70
        netmask 255.255.255.0
 
# IPv6 over tunnel-broker
auto he-ipv6
iface he-ipv6 inet6 v4tunnel
 endpoint   216.66.80.30
 ttl        255
 address    2001:470:1f0a:1604::2
 netmask    64
 mtu        1480
 post-up ip addr add 2001:470:1f0b:1604::1/64 dev eth0
 post-up ip route add ::/0 dev he-ipv6

# The loopback network interface auto lo iface lo inet loopback # The primary network interface allow-hotplug eth0 iface eth0 inet static address 188.40.116.234 netmask 255.255.255.0 network 188.40.116.0 broadcast 188.40.116.255 gateway 188.40.116.206 auto eth0:1 iface eth0:1 inet static address 192.168.2.70 netmask 255.255.255.0 # IPv6 over tunnel-broker auto he-ipv6 iface he-ipv6 inet6 v4tunnel endpoint 216.66.80.30 ttl 255 address 2001:470:1f0a:1604::2 netmask 64 mtu 1480 post-up ip addr add 2001:470:1f0b:1604::1/64 dev eth0 post-up ip route add ::/0 dev he-ipv6

Filed Under: Debian, IPv6, Linux, Networking Tagged With: Debian, interfaces, Ipv6, Linux, network, Ubuntu

Get IPv6 Ready

July 4, 2010 by Igor Drobot Leave a Comment

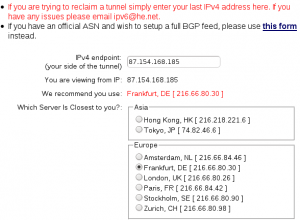
First step is to register a free IPv6 address. Tunnelbroker (tunnelbroker.net) from Hurricane Electrics is one of the best ipv6 offerers. With just a few clicks, you can create a free account.

After you get your generated password to your mail-account, you can login.

After login select on the left side «User Functions > Create Regular Tunnel»;

Important: Your ISP and your Router/Gateway should allow ICMP packets.

Configuration:

1
2
3
4
5
6
7
8
9
10
11
12
# Hurricane Electrics IPv4 Server: 216.66.80.30
# My local IP Address: 87.154.168.185
 
# Hurricane Electrics IPv6 Server: 2001:470:1f0a:1514::1/64
# My IPv6 Adress 2001:470:1f0a:1514::2/64
 
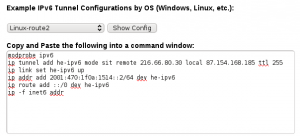
/sbin/ip tunnel add he-ipv6 mode sit remote 216.66.80.30 local 87.154.168.185  ttl 255
/sbin/ip link set he-ipv6 up
/sbin/ip addr add 2001:470:1f0a:1514::2/64 dev he-ipv6
/sbin/ip route add ::/0 dev he-ipv6
/sbin/ip route add 2001:470:9d36::/48 dev lo
exit 0

# Hurricane Electrics IPv4 Server: 216.66.80.30 # My local IP Address: 87.154.168.185 # Hurricane Electrics IPv6 Server: 2001:470:1f0a:1514::1/64 # My IPv6 Adress 2001:470:1f0a:1514::2/64 /sbin/ip tunnel add he-ipv6 mode sit remote 216.66.80.30 local 87.154.168.185 ttl 255 /sbin/ip link set he-ipv6 up /sbin/ip addr add 2001:470:1f0a:1514::2/64 dev he-ipv6 /sbin/ip route add ::/0 dev he-ipv6 /sbin/ip route add 2001:470:9d36::/48 dev lo exit 0

Some additions (17.07.2010 – 21:46):
Also you can use this standard Debian configuration method “/etc/network/interfaces”:

1
2
3
4
5
6
7
8
# IPv6 over tunnel-broker
auto he-ipv6
iface he-ipv6 inet6 v4tunnel
 endpoint   216.66.80.30
 ttl        255
 address    2001:470:1f0a:1514::2
 netmask    64
 mtu        1480

# IPv6 over tunnel-broker auto he-ipv6 iface he-ipv6 inet6 v4tunnel endpoint 216.66.80.30 ttl 255 address 2001:470:1f0a:1514::2 netmask 64 mtu 1480

Of course you will need this extra route to make it working:

1
/sbin/ip route add ::/0 dev he-ipv6

/sbin/ip route add ::/0 dev he-ipv6

Check your configuration:

firewall ~ # ping6 ipv6.google.com
PING ipv6.google.com(2a00:1450:8004::63) 56 data bytes
64 bytes from 2a00:1450:8004::63: icmp_seq=1 ttl=56 time=42.6 ms
64 bytes from 2a00:1450:8004::63: icmp_seq=2 ttl=56 time=42.9 ms

firewall ~ # ping6 ipv6.google.com PING ipv6.google.com(2a00:1450:8004::63) 56 data bytes 64 bytes from 2a00:1450:8004::63: icmp_seq=1 ttl=56 time=42.6 ms 64 bytes from 2a00:1450:8004::63: icmp_seq=2 ttl=56 time=42.9 ms


IPv6 routing table:

1
ip -6 r

ip -6 r

Check your security:

1
nmap 2001:470:1f0a:1514::2

nmap 2001:470:1f0a:1514::2

Some screen shots:


IPv6 logo taken from: Hetzner.de


Filed Under: Debian, IPv6, Linux, Networking, Nmap Tagged With: Debian, IP version 6, Ipv6

  • « Previous Page
  • 1
  • 2
  • 3
Yeaaah Cookie! We use cookies to ensure that we give you the best experience on our website. If you continue to use this site we will assume that you are happy with it.Ok