
![]()
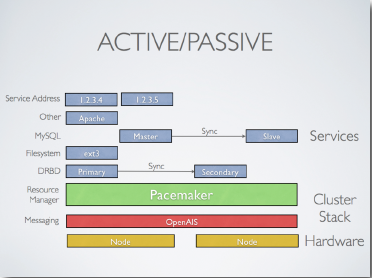
In this article I will explains how to set up and maintain an Active/Passive Cluster, using Pacemaker with Corosync with DRBD replication.
We have two nodes (same hardware), one active and another in passive mode. If the active node goes down, the passive one will automatically take its position and all running services.
This article was written complete for and with Debian 6-squeeze (With a lot of luck you could bring it to run on Ubuntu)
1. Basic notes
Node-1:
Hostname: node-1
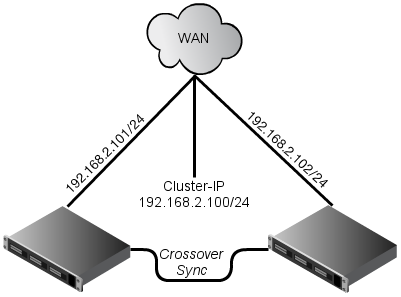
IP: 192.168.2.101
Node-2:
Hostname: node-2
IP: 192.168.2.102
Partitioning:
/dev/vda1 System / ext4
/dev/vda5 reserved for DRBD – empty
/dev/vda6 swap area
Cluster IP: 192.168.2.100
We need this cluster IP to reach currently active node.
This is a physical network structure of the cluster:
2. Basic configuration
To ssh from one node to another without passwords:
1 2 3 4 | root@node-1:~# ssh-keygen root@node-2:~# ssh-keygen root@node-1:~# ssh-copy-id root@192.168.2.102 root@node-2:~# ssh-copy-id root@192.168.2.101 |
Now we need to make sure we can communicate with the machines by their name. If you have a DNS server,
add additional entries for the three machines. Otherwise, you’ll need to add the machines to /etc/hosts .
Below are the entries for my cluster nodes:
1 2 3 4 | root@node-1:~# cat /etc/hosts 127.0.0.1 localhost 192.168.2.101 node-1 192.168.2.102 node-2 |
1 2 3 4 | root@node-2:~# cat /etc/hosts 127.0.0.1 localhost 192.168.2.101 node-1 192.168.2.102 node-2 |
3. Installation
Install corosync:
1 | apt-get install pacemaker |
4. Initial corosync configuration:
Generate key for openais and copy it to node
1 2 3 4 | root@node-1:~# corosync-keygen root@node-1:~# scp /etc/corosync/authkey node-2:/etc/corosync/authkey chown root:root /etc/corosync/authkey chmod 400 /etc/corosync/authkey |
1 2 3 4 | vim /etc/default/corosync # change to yes START=yes scp /etc/default/corosync node-2:/etc/default/corosync |
The only block you must change is the network one:
Full corosync.conf:
1 2 3 4 5 6 7 8 9 10 11 12 13 14 15 16 17 18 19 20 21 22 23 24 25 26 27 28 29 30 31 32 33 34 35 36 37 38 39 40 41 42 43 44 45 46 47 48 49 50 51 52 53 54 55 56 57 58 59 60 61 62 63 64 65 66 67 68 69 70 71 72 73 74 75 | totem { version: 2 # How long before declaring a token lost (ms) token: 3000 # How many token retransmits before forming a new configuration token_retransmits_before_loss_const: 10 # How long to wait for join messages in the membership protocol (ms) join: 60 # How long to wait for consensus to be achieved before starting a new round of membership configuration (ms) consensus: 3600 # Turn off the virtual synchrony filter vsftype: none # Number of messages that may be sent by one processor on receipt of the token max_messages: 20 # Limit generated nodeids to 31-bits (positive signed integers) clear_node_high_bit: yes # Disable encryption secauth: off # How many threads to use for encryption/decryption threads: 0 # Optionally assign a fixed node id (integer) # nodeid: 1234 # This specifies the mode of redundant ring, which may be none, active, or passive. rrp_mode: none interface { # The following values need to be set based on your environment ringnumber: 0 bindnetaddr: 192.168.2.0 mcastaddr: 226.94.1.1 mcastport: 5405 } } amf { mode: disabled } service { # Load the Pacemaker Cluster Resource Manager ver: 0 name: pacemaker } aisexec { user: root group: root } logging { fileline: off to_stderr: yes to_logfile: yes logfile: /var/log/corosync/corosync.log to_syslog: yes syslog_facility: daemon debug: off timestamp: on logger_subsys { subsys: AMF debug: off tags: enter|leave|trace1|trace2|trace3|trace4|trace6 } } |
Now copy this config to your node2:
1 | scp /etc/corosync/corosync.conf node-2:/etc/corosync/corosync.conf |
5. Try and Error:
Lets start corosync and see what’s happening:
1 2 | root@node-1:~# /etc/init.d/corosync start root@node-2:~# /etc/init.d/corosync start |
Check cluster status:
1 | crm_mon --one-shot -V |
1 | crm_verify -L |
Take a look on your logs:
1 | less /var/log/corosync/corosync.log |
6. First cluster resource:
We now turn off STONITH since we don’t need it in this example configuration:
1 | crm configure property stonith-enabled=false |
Now we add our first resource, virtual-IP to the configuration:
1 | crm configure primitive FAILOVER-ADDR ocf:heartbeat:IPaddr2 params ip="192.168.2.100" nic="eth0" op monitor interval="10s" meta is-managed="true" |
Of course there are much more options available like Nic.
7. Use crm:
To use all futures of Corosync you should use the Cluster Resource Manager or CRM command line tool. It’s great and very powerful.
1 2 | root@node-2:~# crm crm(live)# |
Use help command and TAB for completion.
1 2 3 4 5 6 7 8 9 10 11 12 | Available commands:
cib manage shadow CIBs
resource resources management
node nodes management
options user preferences
configure CRM cluster configuration
ra resource agents information center
status show cluster status
quit,bye,exit exit the program
help show help
end,cd,up go back one level |
Get cluster status:
1 | crm_mon --one-shot |
1 2 3 4 5 6 7 8 9 10 11 12 | root@node-2:~# crm_mon --one-shot ============ Last updated: Tue Dec 28 21:50:38 2010 Stack: openais Current DC: node-1 - partition with quorum Version: 1.0.9-74392a28b7f31d7ddc86689598bd23114f58978b 2 Nodes configured, 2 expected votes 1 Resources configured. ============ Online: [ node-1 node-2 ] FAILOVER-ADDR (ocf::heartbeat:IPaddr2): Started node-2 |
8. Maintain
To list cluster configuration:
1 | crm configure show |
To list cluster status and maintain on the status screen:
1 | crm_mon --interval=1 |
Another shorter command for cluster status with fail count overview:
1 | crm_mon -i 2 -f |
resource-stickiness option
Configuring weight-points to change the resource to another node.
When a node goes down and then goes up, this configuration makes the resource that is running on the another server be kept there (that was always up). This is very good to prevent a sync problem on the node that was down, or prevent that the node that is flapping, flap the cluster services.
1 | crm configure rsc_defaults resource-stickiness=100 |
migration-threshold option
The default migration-threshold is INFINITY (that means the value is 1000000) what a little bit too much is:
1 2 3 4 | # Before modification apache2: migration-threshold=1000000 fail-count=1 # After modification apache2: migration-threshold=3 fail-count=1 |
Lets modify it:
1 | crm configure rsc_defaults migration-threshold=3 |
crm_mon
This configuration is very useful to quickly check the cluster status. Should run on both nodes:
1 | crm_mon --daemonize --as-html /var/www/cluster/index.html |
Autostart:
1 | echo "crm_mon --daemonize --as-html /var/www/html/cluster/index.html" >> /etc/rc.d/rc.local |
Click on image to resize:

It’ s a simple HTML plain text with a 5sec refresh.
To migrate a resource to another node, do:
1 | crm resource migrate AP-CLUST node-2 |
To clean up resource messages, do:
1 | crm resource cleanup FAILOVER-ADDR |
To stop (for start use start) FAILOVER-ADDR resource, do:
1 | crm resource stop FAILOVER-ADDR |
Put the first node to standby mode and back to online:
1 2 | crm node standby node-1 crm node online node-1 |
Other
Add resources:
1 2 3 4 5 6 | # DRBD: crm configure primitive DRBD ocf:linbit:drbd params drbd_resource="drbd0" op monitor interval="120s" # Mount target: crm configure primitive SRV-MOUNT ocf:heartbeat:Filesystem params device="/dev/drbd0" directory="/srv/" fstype="ext4" # MySQL resource: crm configure primitive MYSQL lsb:mysql op monitor interval="10s" |
Example configuration:
1 2 3 4 5 6 7 8 9 10 11 12 13 14 15 16 17 18 19 20 21 22 23 24 25 26 27 28 29 30 31 32 33 34 35 36 37 38 39 40 41 42 43 44 45 46 47 48 49 50 51 52 53 | root@node-1:~# crm configure show node node-1 node node-2 primitive APACHE2 lsb:apache2 \ op monitor interval="35s" timeout="20s" start-delay="0s" primitive DRBD ocf:linbit:drbd \ params drbd_resource="drbd0" \ op monitor interval="120s" \ op start interval="0" timeout="240s" \ op stop interval="0" timeout="100s" primitive DRBD-LINKS heartbeat:drbdlinks \ op monitor interval="10s" \ meta target-role="Started" primitive FAILOVER-ADDR ocf:heartbeat:IPaddr2 \ params ip="192.168.2.100" nic="eth0" \ op monitor interval="10s" \ meta is-managed="true" primitive FAILOVER-SRC ocf:heartbeat:IPsrcaddr \ params ipaddress="192.168.2.100" primitive MYSQL lsb:mysql \ op monitor interval="10s" primitive PING-NET ocf:pacemaker:ping \ params dampen="5s" multiplier="100" host_list="192.168.2.1 192.168.2.36 8.8.8.8" \ op monitor interval="60s" timeout="60" \ op start interval="0" timeout="60s" \ op stop interval="0" timeout="60s" primitive SRV-MOUNT ocf:heartbeat:Filesystem \ params device="/dev/drbd0" directory="/srv/" fstype="ext4" \ op start interval="0" timeout="60s" \ op stop interval="0" timeout="60s" group AP-CLUST FAILOVER-ADDR SRV-MOUNT FAILOVER-SRC APACHE2 DRBD-LINKS MYSQL \ meta target-role="Started" ms DRBD-DATA DRBD \ meta master-max="1" master-node-max="1" clone-max="2" clone-node-max="1" notify="true" target-role="Started" clone PING-NET-CLONE PING-NET location cli-standby-AP-CLUST AP-CLUST \ rule $id="cli-standby-rule-AP-CLUST" -inf: #uname eq node-2 location connected_node AP-CLUST \ rule $id="connected_node-rule" -inf: not_defined pingd or pingd lte 0 location master-prefer-node-1 FAILOVER-ADDR 25: node-1 colocation AP-CLUST_on_DRBD inf: AP-CLUST DRBD-DATA:Master order AP-CLUST_after_DRBD-DATA inf: DRBD-DATA:promote AP-CLUST:start property $id="cib-bootstrap-options" \ dc-version="1.0.9-74392a28b7f31d7ddc86689598bd23114f58978b" \ cluster-infrastructure="openais" \ expected-quorum-votes="2" \ stonith-enabled="false" \ no-quorum-policy="ignore" \ start-failure-is-fatal="false" \ last-lrm-refresh="1313668727" rsc_defaults $id="rsc-options" \ resource-stickiness="100" \ migration-threshold="3" |
Special:
NTP:
It is highly recommended to enable NTP-Service on your cluster nodes. Doing so ensures all nodes agree on the current time and makes reading log files significantly easier! For example to find a reason for a split brain, you need the exact time.
OCF resources
To find all OCF resource agents provided by Pacemaker and Heartbeat, run:
1 2 | crm ra list ocf heartbeat crm ra list ocf pacemaker |
Dealing with failconuts:
The output of “crm_mon -i1 -f” shows you some failcounts for your resources:
1 | APACHE2: migration-threshold=3 fail-count=2 |
Clear resource with failcounts:
1 | crm resource cleanup APACHE2 |
Reset failcounts to zero:
1 2 | crm resource failcount APACHE2 set node-1 0 crm resource failcount APACHE2 set node-2 0 |
Maintenance of cluster resources:
If you want to disable your MySQL-Server for a short time you should set it to unmanaged status:
1 2 3 | crm resource meta MYSQL set is-managed false # after upgrades or restarts put it to the managed status back crm resource meta MYSQL set is-managed true |
I have configured a 2 node cluster but both nodes are unable to see each other It happens after multiple times Restransmit both node exclude each other after that i have tried with many times start/stop of corosync and pacemaker at both node but still they are not able to see each other
corosync.conf for both node is same
compatibility: whitetank
totem {
version: 2
secauth: off
threads: 0
interface {
member {
memberaddr: 172.20.172.151
}
member {
memberaddr: 172.20.172.152
}
ringnumber: 0
bindnetaddr: 172.20.172.0
mcastaddr: 226.94.1.1
mcastport: 5406
ttl: 1
}
join: 2000
token: 20000
transport=udpu
}
logging {
fileline: off
to_stderr: no
to_logfile: yes
to_syslog: yes
logfile: /var/log/cluster/corosync.log
debug: off
timestamp: on
logger_subsys {
subsys: AMF
debug: off
}
}
amf {
mode: disabled
}
CIB of one of the node is
node srv-vme-ccs-02 \
attributes Postgresql9-data-status=”LATEST”
primitive ACP ocf:heartbeat:acp \
op start interval=”0″ timeout=”120s” \
op stop interval=”0″ timeout=”60s” \
op monitor interval=”10s” timeout=”60s” \
meta failure-timeout=”2000″ target-role=”Started” is-managed=”true”
primitive ACPIP ocf:heartbeat:IPaddr2 \
params ip=”172.20.172.158″ cidr_netmask=”24″ \
op monitor interval=”10s” timeout=”60s” \
op start interval=”0″ timeout=”60s” \
op stop interval=”0″ timeout=”60s” \
meta failure-timeout=”2000s” target-role=”Started”
primitive AmeyoArchiver ocf:heartbeat:ameyoarchiver \
op start timeout=”120s” interval=”0″ \
op stop interval=”0″ timeout=”60s” \
op monitor interval=”10s” timeout=”250s” \
meta failure-timeout=”2000″ target-role=”Started” is-managed=”true”
primitive AmeyoReports ocf:heartbeat:ameyoreports \
op start timeout=”250s” interval=”0″ \
op stop interval=”0″ timeout=”60s” \
op monitor interval=”10s” timeout=”250s” \
meta failure-timeout=”2000″ target-role=”Started” is-managed=”true”
primitive AmeyoReportsIP ocf:heartbeat:IPaddr2 \
params ip=”172.20.172.159″ cidr_netmask=”24″ \
op start timeout=”60s” interval=”0″ \
op stop interval=”0″ timeout=”60s” \
op monitor interval=”20s” timeout=”60s” \
meta target-role=”Started”
primitive Asterisk ocf:heartbeat:asterisk \
op monitor interval=”10s” timeout=”100s” \
op start interval=”0″ timeout=”60s” \
op stop interval=”0″ timeout=”60s” \
meta failure-timeout=”2000″ target-role=”Started”
primitive AsteriskIP ocf:heartbeat:IPaddr2 \
params ip=”172.20.172.157″ cidr_netmask=”24″ \
op start interval=”0″ timeout=”60s” \
op stop interval=”0″ timeout=”60s” \
op monitor interval=”10s” timeout=”100s” \
meta failure-timeout=”2000″
primitive CRM ocf:heartbeat:crm \
op start interval=”0″ timeout=”60s” \
op stop interval=”0″ timeout=”60s” \
op monitor interval=”10s” timeout=”100s” \
meta failure-timeout=”2000″ target-role=”Started”
primitive CRMIP ocf:heartbeat:IPaddr2 \
params ip=”172.20.172.156″ cidr_netmask=”24″ \
op start interval=”0″ timeout=”60s” \
op stop interval=”0″ timeout=”60s” \
op monitor interval=”10s” timeout=”60s” \
meta failure-timeout=”2000″
primitive DBClusterIP ocf:heartbeat:IPaddr2 \
params ip=”172.20.172.155″ cidr_netmask=”24″ \
op monitor interval=”10s” timeout=”60s” \
op start interval=”0″ timeout=”60s” \
op stop interval=”0″ timeout=”60s” \
meta failure-timeout=”2000s” target-role=”Started”
primitive Djinn ocf:heartbeat:djinn \
op monitor interval=”15s” timeout=”100s” \
op start interval=”0″ timeout=”90s” \
op stop interval=”0″ timeout=”60s” \
meta failure-timeout=”2000″
primitive Ping ocf:pacemaker:ping \
params dampen=”40s” multiplier=”1000″ host_list=”172.20.172.1″ \
op stop interval=”0″ timeout=”80s” \
op monitor interval=”10s” timeout=”60s” \
meta failure-timeout=”40s”
primitive Postgresql9 ocf:heartbeat:pgsql \
params pgctl=”/usr/pgsql-9.3/bin/pg_ctl” psql=”/usr/pgsql-9.3/bin/psql” pgdata=”/var/lib/pgsql/9.3/data/” start_opt=”-p 5432″ rep_mode=”async” node_list=”srv-vme-ccs-01 srv-vme-ccs-02″ restore_command=”” primary_conninfo_opt=”keepalives_idle=60 keepalives_interval=5 keepalives_count=5″ master_ip=”172.20.172.155″ restart_on_promote=”true” \
op monitor interval=”20s” role=”Slave” timeout=”100s” \
op monitor interval=”10s” role=”Master” timeout=”100s” \
op start interval=”0″ timeout=”250s” \
op promote interval=”0″ timeout=”70s” \
op stop interval=”0″ timeout=”70s” \
op demote interval=”0″ timeout=”200s” \
op notify interval=”0″ timeout=”200s” \
meta failure-timeout=”2000s” \
meta migration-threshold=”3″
primitive Server ocf:heartbeat:server \
op monitor interval=”10s” timeout=”250s” \
op start interval=”0″ timeout=”450s” \
op stop interval=”0″ timeout=”160s” \
meta failure-timeout=”2000″ target-role=”Started” is-managed=”true”
primitive ServerIP ocf:heartbeat:IPaddr2 \
op start interval=”0″ timeout=”60s” \
op stop interval=”0″ timeout=”60s” \
op monitor interval=”10s” timeout=”60s” \
meta failure-timeout=”2000s” target-role=”Started”
primitive SyncFolder ocf:heartbeat:syncfolder_RA \
params ip=”172.20.172.157″ folder=”/dacx/var/ameyo/dacxdata/voiceprompts/” \
op start interval=”0″ timeout=”60s” \
op stop interval=”0″ timeout=”60s” \
op monitor interval=”10s” timeout=”60s” \
meta failure-timeout=”2000″
group ACP-with-IP ACP ACPIP \
meta target-role=”Started”
group AmeyoReports-with-IP AmeyoReports AmeyoReportsIP \
meta target-role=”Started”
group Asterisk-with-IP Asterisk AsteriskIP \
meta target-role=”Started”
group CRM-with-IP CRM CRMIP \
meta target-role=”Started”
group Server-with-IP Server ServerIP \
meta target-role=”Started”
ms mspostgres Postgresql9 \
meta master-max=”1″ master-node-max=”1″ clone-max=”2″ clone-node-max=”1″ notify=”true” migration-threshold=”3″ target-role=”Started”
clone Ping_clone Ping \
meta globally-unique=”false” target-role=”Started”
clone djinn_clone Djinn \
meta globally-unique=”true” clone-max=”2″ clone-node-max=”1″
clone syncfolder_clone SyncFolder \
meta globally-unique=”true” clone-max=”1″ clone-node-max=”1″
location ACP-with-IP-Ping ACP-with-IP \
rule $id=”acp-ping-rule” -inf: not_defined pingd or pingd eq 0
location AmeyoReports-with-IP-Ping AmeyoReports-with-IP \
rule $id=”ameyoreports-ip-ping-rule” -inf: not_defined pingd or pingd eq 0
location Asterisk-with-IP-Ping Asterisk-with-IP \
rule $id=”asterisk-ping-rule” -inf: not_defined pingd or pingd eq 0
location CRM-with-IP-Ping CRM-with-IP \
rule $id=”crm-ping-rule” -inf: not_defined pingd or pingd eq 0
location DBClusterIP-Ping DBClusterIP \
rule $id=”db-ip-ping-rule” -inf: not_defined pingd or pingd eq 0
location Server-with-IP-Ping Server-with-IP \
rule $id=”server-ping-rule” -inf: not_defined pingd or pingd eq 0
location failover-acp ACP-with-IP 80: srv-vme-ccs-02
location failover-archiver AmeyoArchiver 80: srv-vme-ccs-02
:
location Server-with-IP-Ping Server-with-IP \
rule $id=”server-ping-rule” -inf: not_defined pingd or pingd eq 0
location failover-acp ACP-with-IP 80: srv-vme-ccs-02
location failover-archiver AmeyoArchiver 80: srv-vme-ccs-02
location failover-callserver Asterisk-with-IP 80: srv-vme-ccs-02
location failover-crm CRM-with-IP 80: srv-vme-ccs-02
location failover-db mspostgres 80: srv-vme-ccs-02
location failover-reports AmeyoReports-with-IP 80: srv-vme-ccs-02
location failover-server Server-with-IP 80: srv-vme-ccs-02
location mspostgres-Ping mspostgres \
rule $id=”mspostgres-ping-rule” -inf: not_defined pingd or pingd eq 0
location prefer-acp ACP-with-IP 90: srv-vme-ccs-01
location primary-archiver AmeyoArchiver 90: srv-vme-ccs-01
location primary-callserver Asterisk-with-IP 90: srv-vme-ccs-01
location primary-crm CRM-with-IP 90: srv-vme-ccs-01
location primary-db mspostgres 90: srv-vme-ccs-01
location primary-reports AmeyoReports-with-IP 90: srv-vme-ccs-01
location primary-server Server-with-IP 90: srv-vme-ccs-01
colocation ip-with-ms +inf: DBClusterIP mspostgres:Master
colocation syncfolder-with-asterisk -inf: syncfolder_clone Asterisk
order archiver-after-DBIP inf: DBClusterIP:start AmeyoArchiver:start symmetrical=false
order database-stop inf: DBClusterIP:stop mspostgres:demote symmetrical=false
order reports-after-DBIP inf: DBClusterIP:start AmeyoReports-with-IP:start symmetrical=false
order server-after-ip inf: DBClusterIP:start Server-with-IP:start symmetrical=false
order syncFolder-after-asterisk inf: Asterisk-with-IP syncfolder_clone
property $id=”cib-bootstrap-options” \
dc-version=”1.1.10-14.el6-368c726″ \
cluster-infrastructure=”classic openais (with plugin)” \
expected-quorum-votes=”3″ \
cluster-recheck-interval=”5min” \
stonith-enabled=”false” \
no-quorum-policy=”ignore” \
placement-strategy=”balanced” \
stop-all-resources=”false” \
last-lrm-refresh=”1511469460″
rsc_defaults $id=”rsc-options” \
resource-stickiness=”100″ \
failure-timeout=”2000s” \
migration-threshold=”5″
op_defaults $id=”op_defaults-options” \
on-fail=”restart”
location ACP-with-IP-Ping ACP-with-IP \
rule $id=”acp-ping-rule” -inf: not_defined pingd or pingd eq 0
location AmeyoReports-with-IP-Ping AmeyoReports-with-IP \
rule $id=”ameyoreports-ip-ping-rule” -inf: not_defined pingd or pingd eq 0
location Asterisk-with-IP-Ping Asterisk-with-IP \
rule $id=”asterisk-ping-rule” -inf: not_defined pingd or pingd eq 0
location CRM-with-IP-Ping CRM-with-IP \
rule $id=”crm-ping-rule” -inf: not_defined pingd or pingd eq 0
location DBClusterIP-Ping DBClusterIP \
rule $id=”db-ip-ping-rule” -inf: not_defined pingd or pingd eq 0
location Server-with-IP-Ping Server-with-IP \
Is there any way than than OCF script to avoid someone from going to the cluster and doing a start/stop from /etc/init.d/, which is supposed to be done via the cluster commands?
Can we point a new path for LSB scripts in cluster?
Can you help me to configure openNMS HA
Thanks
doudou, you should configure a resource group with all your resources. In case of failure, your group with all your included resources will move to another node.
Hi zeldor,
i’ve a pacemaker/corosync with 2 nodes.
– a FAILOVER-ADDR
– a service (syslog-ng)
All works fine, but…
If, for example, i do an error on syslog conf on the first node, who have the FAILOVER ADDR, when i kill syslog, node 1 try to start syslog but he can’t (normal).
My problem, he move this resource to node 2, but FAILOVER ADDR stay on node 1.
It is possible, to configure, when one service fail and can’t restart, to move ALL resources to another node, include the FAILOVER ADDR of course..
Thanks
disculpe pacemaker y corosyn funcionan en CENTOS 5.5 o cual distro me aconsejarian para mi cluster HA aguardo su respuesta saludos
I installed cluster on CentOS.
resource-agents-3.9.2-40.el6_5.6.x86_64
corosync-1.4.1-17.el6.x86_64
pacemaker-1.1.10-14.el6_5.2.x86_64
I have these commands available:
crmadmin crm_error crm_mon crm_resource crm_standby
crm_attribute crm_failcount crm_node crm_shadow crm_ticket
crm_diff crm_master crm_report crm_simulate crm_verify
Strange. Maybe you have another syntax in your distro/version? http://oss.clusterlabs.org/pipermail/pacemaker/2010-November/008417.html
Thanks Zeldor, but restart command in crm_resource doesn’t exist…
Hi Stefano,
you can perform a restart of mysql over crm shell: crm resource restart mysqld
Another Idea: you can set mysql to “unmanaged”-state for the cluster and restart mysql manually.
When I edit the mysql file /etc/my.conf, how I restart the service that is controlled by pacemaker?
Thank you! Great manual!
Ortim, I work at moment for axxeo so if you are ready to pay for this work, we could bring your cluster to work. You can contact us over this form
I’ve never setup Crosync and Pacemaker.
But now for my work i need a failover between two servers.
after a full night work can’t connect between two nodes.
Can you help me. I can also pay to you
Thanks.
Rob, thank you for commenting! The default value of secauth on Ubuntu systems is on. Debian provide the default configuration file with off. This option is only for the totem messages.
The creation of authkey for corosync is only for communication between your two or more nodes.
Encryption and authentication consume 75% of CPU cycles in aisexec as measured with gprof when enabled.
I will say its better to use another security solutions like netfilter – iptables command.
if you want to use the authkey make sure to enable the use of it…
secauth: on
Hi,
Upon first starting corosync on my two nodes and running crm_mon I see that the Current DC is set to ‘NONE.’ It also only shows 1 node configured (this is consistent when I run crm_mon on either node). I’m not sure how to to get the nodes to acknowledge one another. All we really do is copy the same authkey over – what causes the nodes to see each other? Thank you for any help and input.
Thank you!
bindnetaddr: specifies the address which the corosync executive should bind. This address should always end in zero. In other words its local LAN subnet address: example 192.168.2.0/10.1.100.0
DRBD has 2 separate posts, you can find the here: http://zeldor.biz/tag/drbd/
Really nice article. I had tried this couple of months before and tried again today. I dont remember now, I had to change the ip address in the following
interface {

                # The following values need to be set based on your environment

                ringnumber: 0

                bindnetaddr: 192.168.2.0

                mcastaddr: 226.94.1.1

                mcastport: 5405

        }
to ip address of each individual node. Eg. on node1, I had to put the ip only for node1 and on node2, I had to put node2’s ip address. But here you just put the 192.168.2.0. It seems it is network range. Can you please clarify on that?. Also can you please add here, how to setup DRDB on individual nodes?.
Again thank you very much for nice article . It is really helpful.
don’t mind my last post.. you can delete it.. missed to see the scroll bar
krgds
/Fred
Hi,
I didn’t want to ask anything, just to see the entire blog. As it is now it doesn’t show all text.. So I need to submit something to get to the page where I can see it all ;)
Hey, yeah we are working really on much similar and great things – that is cool, two heads are better than one:)
Pacemaker is really fascinating, I had a lot fun to work with it. I have a webserver-cluster running under Fedora 14 ; normally I use only Debian but in this case I wanted to have newer version of pacemaker.
My apprenticeship project was about HA-Cluster with Pacemaker.
On what kind of cluster are you working?
id
Looks like we are working on many similar things :-)
Thanks for this post, I still have to go through it, but if you want to be able to ssh from one host to the other, copy your SSH key on both servers and use “ssh -A”.
Cheers
Seb